Cabinet Painting Sacramento is one of the most popular DIY projects because it can make such a big impact on your kitchen! It’s important to take into account all of your hard surfaces when selecting a color.
For cabinets, you’ll want to use an oil-based primer. This will give you a better finish and won’t yellow like latex paints do.
Cabinet painting can give an updated look to old, tired wood cabinets. Even if your cabinets are a nice solid wood, or have an exquisite grain pattern that you love to showcase, they can still benefit from a new coat of paint – especially if the current color has faded and the finish is showing signs of wear.
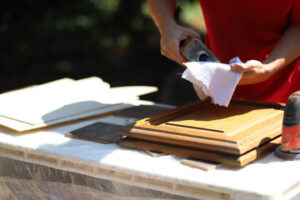
However, before you start brushing on your favorite hue, you’ll need to thoroughly clean your cabinetry, as well as any doors or drawer fronts that are visible from the kitchen. Using a degreaser can help cut through the grease, wax, and grime that collects over time in a busy kitchen. Once you’ve prepped the surface, it’s time to apply the primer. Primer is a must when painting cabinets, as it provides adhesion and prevents future chipping and peeling – especially in moisture-prone areas like the kitchen.
The type of primer you use depends on the surface. If you’re painting bare hardwood, a stain blocking primer may be required. If your cabinets are glazed or have a faux surface, a water-based urethane primer is typically best. A foam roller can make quick work of flat surfaces, but a soft-bristled brush is often needed to get into tight spots and corners.
If you’re planning to stain your cabinetry, it’s important to select a high-quality, low-VOC stain. Stains contain volatile organic compounds (VOCs), which can irritate the nose, eyes, and throat if inhaled. A water-based stain is less toxic, but it still needs to be applied in a well-ventilated area and can take up to 30 days to cure completely.
Once the primer is dry, you can begin the actual painting process. If you have a sprayer, use it to paint the majority of your cabinets – it can save time and can produce a much smoother, professional finish than a brush or roller alone. If you don’t have a sprayer, be sure to allow enough time to finish each section of your project before the paint can dry – this will prevent drips and streaks. Once your first coat is complete, let it dry according to the manufacturer’s instructions.
MDF
MDF cabinets can help to elevate an eclectic, farmhouse or glamorous kitchen design. They provide a sleek, glossy finish that can make a room feel clean and bright. They can also help to create a seamless look that complements other elements in the room, such as a marble countertop or stainless steel appliances. However, MDF is not as durable as solid wood, and it can be prone to moisture damage if not properly treated.
The best way to prepare MDF for painting is to sand it down and seal the surface before beginning the project. To sand MDF, use 220-grit sandpaper and a sanding block to remove any bumps or wax coatings. Then, wipe the sanded MDF down with a tack cloth to remove any dust particles and ensure that the surface is free of residue.
Once the MDF is sanded and cleaned, it needs to be conditioned with a clear sanding sealer before you can begin painting. This product should be oil-based, as water-based primer can cause the MDF to swell. You can apply the sealer with a brush, roller or paint sprayer based on your preference. Allow the sealer to dry according to the manufacturer’s instructions before proceeding with the next step.
If you have any nail holes or other imperfections in the MDF, fill them with wood filler and sand it smooth before applying the sealer again. Once the filler is dry, you can sand the MDF again with 220-grit sandpaper to ensure that the filled areas match the rest of the surface for a flawless finish.
As with any project involving the application of paint, it is important to work in a well-ventilated area and use a mask to protect your lungs from chemical fumes. Always wear latex gloves when sanding MDF, and be sure to lay down drop cloths to protect any other surfaces in the work area from spills and drips. Before you start painting, it’s a good idea to test your colors on a piece of MDF or a scrap piece from the actual cabinet doors. This will give you an idea of how the color will look when it’s on your cabinet, and you’ll be able to make any necessary adjustments before beginning the project.
Alder
Alder wood is a very strong and stable hardwood that is easy to work with. It takes stain and glues well, and cuts easily. It also sands well, and does not “fuzz up” when you sand it as much as Poplar or Pine. Alder can be stained in light or dark tones, and it works very well for two-tone kitchens. Its knotty appearance is popular for rustic styles, and it can be painted to hide the appearance of the knots if desired.
Before you start painting your cabinet doors, you must make sure they are clean and ready for the paint to adhere properly. Use a degreaser cleaner, such as trisodium phosphate (TSP), and wipe down the cabinetry to remove all oils and dirt that could prevent a perfect finish.
Once the cabinetry is cleaned, sand the surface to smooth it. Using a fine-grit sanding block, scuff the entire surface of the cabinetry before moving to the next level of grit. Then vacuum all surfaces to ensure no dust remains on the surface, and rub down with a tack cloth as a final step before proceeding.
If you are using a high-quality primer, and apply a good coat of high-quality latex paint, your cabinetry should remain flawless for years to come. But remember that Alder, like all softer woods, can be more susceptible to scratches and dents than harder woods such as Oak or Walnut.
The average daily cost for hiring a professional to paint your cabinets is $897, according to home services booking platform Angi. However, if you are willing to put in the time and effort, you can save yourself some money by doing it yourself. If you are thinking about a kitchen remodel, be sure to consider the costs of new cabinets as part of your total remodeling budget.
Pine
Pine furniture, whether it’s waxed, varnished or bare, can be transformed with the addition of a new coat of paint. However, before you grab your paintbrushes and start painting, there are a few things that need to be done beforehand.
First, you’ll need to sand the surface of the wood and open up the grain to prepare it for priming and painting. This will make sure that the new paint will adhere to the surface and won’t peel later on. It’s also a good idea to use a primer that’s compatible with your chosen paint color. If you’re using a water-based paint, try something like a Mythic Universal primer or Blackfriars Ultimate, as they’re both proven to be high adhesion products.
For oil-based paints, opt for an alkyd primer. These are designed to bond really strongly with both mechanical and chemical means to create a strong, uniform finish. They’re also resistant to the color bleeding that can sometimes happen with some types of pine and particleboard.
Next, you’ll need to apply a couple of coats of your chosen paint to the surface of the pine. You should be sure to allow the first coat to fully dry before applying the second. Depending on the product you choose, you may need to apply more than two coats to achieve a good level of coverage.
Once your pine cabinets have been painted, you’ll need to let them dry completely before touching or rehanging them. This will ensure that the paint will have enough time to cure properly, giving you a smooth, durable finish that’s resistant to wear and tear.
If you’re not comfortable with carrying out a project as complex as cabinet painting, consider hiring a professional. There are many experienced and trusted furniture painters across the country who can transform your kitchen’s look with minimal fuss. They’ll be able to advise you on the best materials, color options, and finishes to give your pine cabinets a fresh, modern appearance that will stand the test of time. Average daily painter rates are around $200, so this is a cost-effective way to give your kitchen a brand new look that will last for years to come.