Home » Home Improvement
Category Archives: Home Improvement
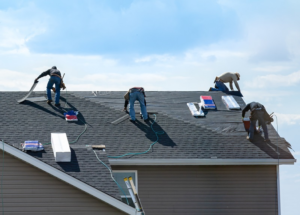
Important Components of a Roofing Project
Roofs protect the building interior from rain, snow, sunlight, extreme temperatures, and wind. They’re also an important component in home mitigation against increasing wildfire risks.
A roof’s skeleton is made of rafters or prefabricated trusses, which rest on top of a deck board, known as sheathing. The sheathing is usually plywood or oriented strand board (OSB), but older houses may have tongue-and-groove or narrow 1-by-4 skip sheathing boards of sawn lumber. Click Visit Website to learn more.
Plywood is an essential building material for the sheathing of your roof. It’s made of thin layers, or plies, of wood, glued together with an alternating grain pattern. This creates a stronger product with greater resistance to shear and twisting forces. It’s also less expensive than dimensional lumber and is available in different grades and thicknesses, which your roofing contractor can choose from depending on the specific requirements of your project.
Plywood comes in 4-by-8-foot sheets and is rated using two letters, with A being the highest quality and D being the lowest. You can even purchase plywood that combines the grades if you need both a high and low grade in one sheet. For roof sheathing, look for CDX plywood, which has a high-grade face and back and is suitable for outdoor use.
In addition to standard plywood, you can also find specialty types that have been treated for resistance against moisture or are used in construction. For example, marine-grade plywood is designed to withstand prolonged exposure to water and is often used on boats. OSB (oriented strand board) is a cheaper alternative to plywood but doesn’t fare as well with moisture, which can cause it to swell or even delaminate over time.
Insulated plywood is another option that’s ideal for roof sheathing because it has an insulated foam core glued between two outer layers of plywood. It’s also less prone to warping and can be painted, which makes it a good choice for projects where appearance is important. Shuttering plywood is a cheap version of plywood that isn’t suitable for roofing and is often used as formwork to hold concrete while it sets.
Shingles
Whether they’re cedar or asphalt, shingles are the roof coverings that give homes their character and color. They’re usually attached in overlapping courses, or rows, and can be found on a wide range of residential buildings. Newer shingle types use different materials, but they are designed for durability and weather resistance.
A shingle’s structure is built of several layers, each with its own function. The backbone is the fiberglass mat, which offers the ideal combination of strength and flexibility. This layer is coated with a heat-activated adhesive to bond the shingle to its underlayment. Over this layer are stone granule surfacing and a protective asphalt coating. The granules are often tinted to provide color coordination with the underlayment and the roofing material.
The final layers are the ridge cap and hip shingles. These shingles aren’t nailed in like the field shingles; instead, they’re placed along the ridge of the roof, and are intended to straddle the peak and shed water down either slope. These shingles typically have a higher wind rating than those below them, and some manufacturers offer high-wind limited warranties for these shingles as well.
Many areas experience severe storms that cause shingle damage. These breaks can compromise a roof’s waterproofing, leaving it vulnerable to leaks and mold. In these cases, homeowners should look for impact rated shingles. These shingles are designed to resist the damage caused by hail and other severe weather elements. They typically have a higher price tag than those without this feature, but can save homeowners the cost of roof replacement. They can also protect a roof from water infiltration after the weather has passed, and they help to reduce the risk of roof fires.
Felt
Felt is the underlayment used in roofing and is one of the most important components for a roof to function properly. It’s a thin water-shedding layer that prevents moisture from seeping in between the roof shingles and contacting the wood roof deck. Felt also helps protect the roof from wind-driven rain and snow that can penetrate and damage the structure of the roof.
Historically, felt was made from tear-resistant paper and was saturated with tar or asphalt. The tar helped to keep the felt waterproof and gave it some strength as well. The felt was then rolled out onto the roof and cut to the proper size for installation. The thickness of the felt was determined by its weight; 15 and 30 pound felt was commonly used for residential roofs, and those products were often referred to as black or traditional roofing felt.
Today, there are other types of underlayment that can be used for roofing. Some of them are not felt and do not contain tar or asphalt but are instead composed of fibers or other materials like fiberglass, polypropylene, and polyester. Some underlayment options are even insulated to provide additional protection for the roof and help it to maintain its thermal efficiency.
While synthetic underlayment does have a number of advantages, many homeowners prefer the more traditional felt. Felt is easy to install and can be less expensive than the synthetic options. Depending on the roof and weather conditions, it may be necessary to use heavier or more layers of felt. Heavier felt is especially important if the roof is located in an area that receives heavy snowfall each year or experiences frequent winds, both of which can drive water up between the shingles and cause leaks.
Underlayment
The underlayment of a roof is a waterproof or water-resistant material that protects your home and the roof deck from the elements. It is placed directly on the roof surface before the installation of the roofing materials. It is often concealed by the roofing material, but it is essential to your roof’s longevity and the structural integrity of your house. It prevents tar from leaking under the shingles, which would damage the plywood or OSB below it, and can even cause rot in the structure itself.
Before installing a new roof, you should understand the different options available for underlayment. There are many factors that will affect this choice, including the region of your home, local building codes and the type of roof system. Additionally, the underlayment material itself may have a large impact on the performance of your roof.
Some common underlayments include asphalt-saturated felt, rubberized asphalt and non-bitumen synthetic underlayment. Felt is old-fashioned and less expensive than the synthetic options, but it is less durable and provides little protection against water damage. While rubber synthetics are much more expensive, they offer better shingle warranty protection and can be easier to work with than felt.
Choosing the right underlayment for your roof will ultimately depend on the type of shingles or other roofing material you have chosen for your home. The product permeability of the underlayment will also play an important role in determining how well your roof will perform against the elements. For instance, shingle roofs tend to have higher permeability than metal or tile roofs. This is because moisture and heat move more easily through shingle roofs. Likewise, this means that a properly installed underlayment will help to keep moisture and heat out of your home, thereby reducing energy costs.
Flashing
A roof’s flashing prevents water leaks by redirecting rainwater away from seams, joints, and openings where the roof meets vertical surfaces. It also helps shield areas where there is a difference in air pressure between the wall cladding and roof decking.
Flashing is made of metal, and it can be installed in different shapes, styles, and materials. For instance, copper flashing is an attractive choice, as it doesn’t rust. It also ages gracefully by forming a green patina over time, and it works well with many types of roofing materials. Other flashing options include galvanized steel, aluminum, and stainless-steel.
When installed properly, flashing prevents leakage from the walls of a home and roof and protects the area against damage and mold. It also provides extra weather resistance to gutters and prevents the build-up of ice dams.
Typically, flashing is used at the corners of a building, the low points where two roof slopes meet (also known as valleys), and around other features like chimneys, vent pipes, skylights, and roof protrusions. Flashing is also used to waterproof roof penetrations.
The most common type of flashing is called base flashing, and it’s usually a long piece that’s installed at the intersection of a roof and a vertical surface, such as a wall. It’s often installed with a counter flashing, which is placed opposite and above the base flashing to cover and protect it. Together, the base and counter flashings allow for expansion and contraction of the roof material without damaging the flashing. Other types of flashing include sill flashing, which is installed above doors and windows to prevent water from entering walls; parapet flashing, which caps the tops of masonry walls; and box guttering, which adds a decorative finish to a roof’s edge.
Tips and Insights on Window Replacement
If your windows are letting in too much sound, or if condensation has started building up between the double panes, it’s probably time to replace them. You can purchase replacement windows from a home center or through a window contractor.
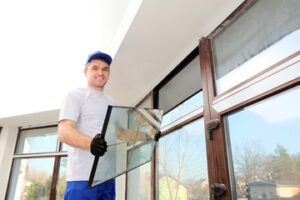
Full-frame replacement windows install directly into the existing frames, while insert windows fit inside the frame. Both types are available in a wide range of shapes, sizes and styles. Call Window Replacement Ellicott City, MD for trusted advice.
The frame of a window is the structure that supports and anchors the glass. This is the part that is most often damaged and needs repair or replacement. The frame also serves as an important insulator and can contribute to energy efficiency. It can be made from wood, vinyl, fiberglass, or aluminum. Wood frames are most commonly used due to their warm look and insulating properties. Wood frames require more maintenance as they need to be sanded, sealed, and painted on a regular basis to protect the wood from moisture, UV rays, and temperature fluctuations that can cause damage.
A window replacement that is a full-frame installation will require the removal of the existing casing, trim, and jambs from both the inside and outside of the home. The old sash will then be removed and the new replacement window installed in the rough opening. The installer will then put the insulation in and caulk around the edges to help seal out drafts. A final coat of paint or stain will be applied to enhance the aesthetic and protect the window from rain, snow, and debris.
When a window is installed in a load-bearing wall, the framing may need to be reinforced or augmented to support the weight of the new window. This is also the time to address any water damage or rot that has developed in the existing frame.
While a minor case of rot may be repaired, extensive or deep rotting usually indicates that the frame needs to be replaced. A professional will be able to advise you as to whether the damage is repairable or if it would be better to invest in a full-frame replacement.
An alternative to wooden frames is a composite frame. This style combines the best of both worlds as it provides the warmth and insulating qualities of wood with the low maintenance and energy efficiency of fiberglass, vinyl, or aluminum. A common brand of these frames is called Alside and can be purchased at most hardware stores. They come in a variety of colors and finishes to compliment any home.
Glass
When a window becomes broken or cracked, replacing the pane can be a great way to increase home safety, as well as increase your home’s energy efficiency and curb appeal. However, before you choose to repair or replace your window glass, it’s important to consider the entire picture – including your budget and end goals.
Window glass costs make up about 40% to 60% of your total window replacement cost. It’s an expensive component, and it can add up quickly, especially if you opt for larger windows or multipaned designs that require more labor to install.
To start, prepare the work area by removing any curtains or furniture in the vicinity and covering the floor with a sheet of plastic or cloth for protection. Then, carefully remove any old glazing material and paint by using a pull-type scraper, a chisel, or a heat gun. If the pane is secured with pieces of wood molding, use a flat pry bar to remove them and then scrape the grooves to prepare the surface for your new glass.
Next, measure the opening and subtract 1/16 inch from each side to ensure a snug fit for your new glass pane. Visit your local hardware store to have a piece of tempered, laminated, or low-E glass cut to this size and test it in the frame for a secure fit. When it comes time to reinstall the window, run a line of silicone caulk around the edges and press the pane in place.
Although you may only need to replace the pane, this is a perfect opportunity to upgrade to a more energy-efficient style of window. Double-pane insulated glass windows are available that are much more efficient than older single-pane options. In addition to increasing energy efficiency, double-pane windows also reduce outside noise and provide more privacy while adding value to your home.
Sash
The sash is the window frame part that holds glass panes in place and creates a barrier between the inside and outside of your home. Its design and appearance vary based on architectural style, window type (such as single-hung and double-hung), and personal preference. Sash options include muntin bars, decorative grilles, and clad or raw wood. A sash is also the mechanism that allows you to open and close your window.
If you’re experiencing problems with opening and closing your windows, you may need to replace the sash. This is an easy DIY task, but it’s a good idea to consult a professional window contractor to make sure the job is done right.
The first step in replacing a sash is to take full measurements of the window opening and frame. This will ensure you purchase the correct replacement sash for your window.
You should also clean the frame, sash, and tracks. Dust buildup can prevent your sash from opening and closing smoothly, and it can lead to rust or corrosion of hardware. Using a vacuum cleaner attachment and a wood filler to repair any cracks or damage can help keep your sash in good condition for as long as possible.
Window sashes are available in several different materials, including aluminum and vinyl. Each material has its own advantages and disadvantages. Aluminum sashes are relatively inexpensive and are less likely to warp, crack or discolor over time. However, they are less energy efficient than wood sashes. Vinyl sashes are more expensive than aluminum, but they last longer and offer greater energy efficiency than wood.
If your sash is damaged, it’s important to fix the problem as soon as possible to prevent further damage and extend the life of your window. Replacing a window sash is a moderately complex project that requires removing the old hardware and parts, installing new ones, and caulking to seal any gaps. Getting the job done properly by a professional will help you avoid any structural problems that may arise from a botched installation.
If your sash’s pulleys are squeaking, they can usually be lubricated to stop the noise. A small amount of silicone spray can be used to lubricate the pulleys and make your windows easier to open and close.
Trim
A window’s trim enhances its beauty and helps the window stand out. It adds a decorative touch and coordinates with the molding in your home’s other rooms.
When you replace your windows, you should consider replacing the interior trim as well to ensure a uniform look. Window casings come in different widths and styles to suit your home’s design. You can also find a wide range of colors and stains to match your other trim and furniture. Some materials require more maintenance than others, so think about the style and longevity of your new trim before deciding on it.
Most trim is made from wood, although MDF and finger-joint pine are popular alternatives. Wood offers a classic, natural look and is durable and versatile. It can be painted to complement your home’s color scheme or stained to bring out the natural grain and texture of the wood. Some homeowners choose to forgo traditional trim altogether, opting for a more minimal and modern look with integrated sealing solutions built into the frame itself.
Before installing new trim, clean the old trim surface to remove any dirt and debris that may interfere with the application of caulk. Score the edges of the existing trim with a utility knife to prevent damaging the wall or window framing. Then, gently pry off the casing, stool, and apron molding using a flat pry bar. Remove any nails or screws left behind.
Once the surface is clean, prepare it for caulking by masking over any areas that will not be painted to protect them from accidental smears. A ladder may be necessary if you’re working on higher windows. Then, measure the lengths of your trim pieces to avoid wasting any wood. Plan out your pieces and make a master cut list in advance to save time on the job. Remember to buy a few extra pieces for bad splits or mistaken cuts.
Before you start caulking, it’s important to prep the area with a damp cloth or sponge. This will clean any dust and dirt from the surface, ensuring the caulk adheres properly and provides a watertight seal. After letting the caulk dry, you can paint or stain the trim to match your home’s design and décor.
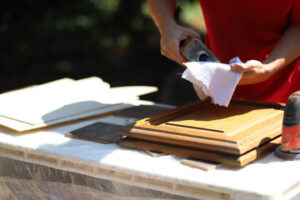
Cabinet Painting Can Transform Old Wooden Cabinets
Cabinet Painting Sacramento is one of the most popular DIY projects because it can make such a big impact on your kitchen! It’s important to take into account all of your hard surfaces when selecting a color.
For cabinets, you’ll want to use an oil-based primer. This will give you a better finish and won’t yellow like latex paints do.
Cabinet painting can give an updated look to old, tired wood cabinets. Even if your cabinets are a nice solid wood, or have an exquisite grain pattern that you love to showcase, they can still benefit from a new coat of paint – especially if the current color has faded and the finish is showing signs of wear.
However, before you start brushing on your favorite hue, you’ll need to thoroughly clean your cabinetry, as well as any doors or drawer fronts that are visible from the kitchen. Using a degreaser can help cut through the grease, wax, and grime that collects over time in a busy kitchen. Once you’ve prepped the surface, it’s time to apply the primer. Primer is a must when painting cabinets, as it provides adhesion and prevents future chipping and peeling – especially in moisture-prone areas like the kitchen.
The type of primer you use depends on the surface. If you’re painting bare hardwood, a stain blocking primer may be required. If your cabinets are glazed or have a faux surface, a water-based urethane primer is typically best. A foam roller can make quick work of flat surfaces, but a soft-bristled brush is often needed to get into tight spots and corners.
If you’re planning to stain your cabinetry, it’s important to select a high-quality, low-VOC stain. Stains contain volatile organic compounds (VOCs), which can irritate the nose, eyes, and throat if inhaled. A water-based stain is less toxic, but it still needs to be applied in a well-ventilated area and can take up to 30 days to cure completely.
Once the primer is dry, you can begin the actual painting process. If you have a sprayer, use it to paint the majority of your cabinets – it can save time and can produce a much smoother, professional finish than a brush or roller alone. If you don’t have a sprayer, be sure to allow enough time to finish each section of your project before the paint can dry – this will prevent drips and streaks. Once your first coat is complete, let it dry according to the manufacturer’s instructions.
MDF
MDF cabinets can help to elevate an eclectic, farmhouse or glamorous kitchen design. They provide a sleek, glossy finish that can make a room feel clean and bright. They can also help to create a seamless look that complements other elements in the room, such as a marble countertop or stainless steel appliances. However, MDF is not as durable as solid wood, and it can be prone to moisture damage if not properly treated.
The best way to prepare MDF for painting is to sand it down and seal the surface before beginning the project. To sand MDF, use 220-grit sandpaper and a sanding block to remove any bumps or wax coatings. Then, wipe the sanded MDF down with a tack cloth to remove any dust particles and ensure that the surface is free of residue.
Once the MDF is sanded and cleaned, it needs to be conditioned with a clear sanding sealer before you can begin painting. This product should be oil-based, as water-based primer can cause the MDF to swell. You can apply the sealer with a brush, roller or paint sprayer based on your preference. Allow the sealer to dry according to the manufacturer’s instructions before proceeding with the next step.
If you have any nail holes or other imperfections in the MDF, fill them with wood filler and sand it smooth before applying the sealer again. Once the filler is dry, you can sand the MDF again with 220-grit sandpaper to ensure that the filled areas match the rest of the surface for a flawless finish.
As with any project involving the application of paint, it is important to work in a well-ventilated area and use a mask to protect your lungs from chemical fumes. Always wear latex gloves when sanding MDF, and be sure to lay down drop cloths to protect any other surfaces in the work area from spills and drips. Before you start painting, it’s a good idea to test your colors on a piece of MDF or a scrap piece from the actual cabinet doors. This will give you an idea of how the color will look when it’s on your cabinet, and you’ll be able to make any necessary adjustments before beginning the project.
Alder
Alder wood is a very strong and stable hardwood that is easy to work with. It takes stain and glues well, and cuts easily. It also sands well, and does not “fuzz up” when you sand it as much as Poplar or Pine. Alder can be stained in light or dark tones, and it works very well for two-tone kitchens. Its knotty appearance is popular for rustic styles, and it can be painted to hide the appearance of the knots if desired.
Before you start painting your cabinet doors, you must make sure they are clean and ready for the paint to adhere properly. Use a degreaser cleaner, such as trisodium phosphate (TSP), and wipe down the cabinetry to remove all oils and dirt that could prevent a perfect finish.
Once the cabinetry is cleaned, sand the surface to smooth it. Using a fine-grit sanding block, scuff the entire surface of the cabinetry before moving to the next level of grit. Then vacuum all surfaces to ensure no dust remains on the surface, and rub down with a tack cloth as a final step before proceeding.
If you are using a high-quality primer, and apply a good coat of high-quality latex paint, your cabinetry should remain flawless for years to come. But remember that Alder, like all softer woods, can be more susceptible to scratches and dents than harder woods such as Oak or Walnut.
The average daily cost for hiring a professional to paint your cabinets is $897, according to home services booking platform Angi. However, if you are willing to put in the time and effort, you can save yourself some money by doing it yourself. If you are thinking about a kitchen remodel, be sure to consider the costs of new cabinets as part of your total remodeling budget.
Pine
Pine furniture, whether it’s waxed, varnished or bare, can be transformed with the addition of a new coat of paint. However, before you grab your paintbrushes and start painting, there are a few things that need to be done beforehand.
First, you’ll need to sand the surface of the wood and open up the grain to prepare it for priming and painting. This will make sure that the new paint will adhere to the surface and won’t peel later on. It’s also a good idea to use a primer that’s compatible with your chosen paint color. If you’re using a water-based paint, try something like a Mythic Universal primer or Blackfriars Ultimate, as they’re both proven to be high adhesion products.
For oil-based paints, opt for an alkyd primer. These are designed to bond really strongly with both mechanical and chemical means to create a strong, uniform finish. They’re also resistant to the color bleeding that can sometimes happen with some types of pine and particleboard.
Next, you’ll need to apply a couple of coats of your chosen paint to the surface of the pine. You should be sure to allow the first coat to fully dry before applying the second. Depending on the product you choose, you may need to apply more than two coats to achieve a good level of coverage.
Once your pine cabinets have been painted, you’ll need to let them dry completely before touching or rehanging them. This will ensure that the paint will have enough time to cure properly, giving you a smooth, durable finish that’s resistant to wear and tear.
If you’re not comfortable with carrying out a project as complex as cabinet painting, consider hiring a professional. There are many experienced and trusted furniture painters across the country who can transform your kitchen’s look with minimal fuss. They’ll be able to advise you on the best materials, color options, and finishes to give your pine cabinets a fresh, modern appearance that will stand the test of time. Average daily painter rates are around $200, so this is a cost-effective way to give your kitchen a brand new look that will last for years to come.